Tuesday, September 30, 2008

Flare and bear

Brown bear and sunrise, Katmai National Park, Alaska
Canon 1Ds Mark III, 24-105mm 4.0L (32mm), 1/250 sec @ f/11, ISO 100

The versatility of zoom lenses is so appealing that I use prime lenses less often these days. However, they are notorious for lens flare and controlling that can be difficult. On this trip, I did bring a 24mm prime just for the purpose of daybreak landscapes which include the sun. Where was that lens on this fine morning? Back in camp, I forgot to bring it, since I was traveling light.

This was a very complicated photo for a number of reasons. Not a small issue was the temperature variations so near freezing and high humidity of morning fog. This caused my lens to fog over. And, every time I would put my eye up to the camera the view finder would fog up also. To complicate all this, I could not see my exposure values because I was blinded by shooting directly into the sun. In retrospect, this would have been a worthy time to experiment with the live view feature of the 1Ds (that is, you view the scene on the monitor on the back of the camera like most little digicams offer). I expected all sorts of unwanted lens flare but the position of the sun somewhat near the center of the frame helped to reduce that, and the flare that did show up almost creates a sense of motion.


Wednesday, September 24, 2008

Pro image quality becomes more affordable

Canon will soon be shipping the recently announced, much anticipated 5D Mark II. It matches the company's flagship 1DS Mark III for resolution, with 21.1 megapixels, and boasts some interesting new features. Perhaps most interesting to many, however, is the price. At $2699 verses $7999 for the 1Ds Mark II, it brings professional resolution and features to a slightly more mainstream level.


The real question for us, however, is what's next?


Friday, September 19, 2008

More merged panoramas

In keeping with the theme of panoramas, here are a few more scenes from my August trip to Denali Park. They are pretty small in the this blog template, which I'm not too crazy about, so click on the image and it will load a little larger.


Wednesday, September 17, 2008

Panorama Landscapes

Creating panorama images using a digital camera is one example of the diversity available in todays age of digital photography. In the film days I used a medium format 6cm x 17cm film camera (to the tune of about 10K w/lenses) and although it made great images, it was slow and cumbersome. Today however, instead of carrying two different camera types one can use a digital camera to shoot multiple frames and stitch them together with an automated feature in Adobe Photoshop.

While the shooting process is fairly simple, there are a few things to consider from a technical perspective. First of all, a tripod head that rotates is very helpful. I use a ballhead primarily favored for wildlife photography and Really Right Stuff makes one that includes a rotating plate as part of the quick release. It is the PCL version if you look for it on their website. Basically, this gives a pan axis to the top of the ballhead independent of the ballhead base. The handy level bubble on the plate makes it easy to establish a base angle without needing to fuss with the legs to level your camera. While advocating the use of good tripod and head, I have shot a number of panoramas hand held--this is generally done with long lenses. Any slight mismatch of frames can be cropped out later. In addition, shooting vertical is an option, which generates a larger file size and requires more frames to create the 1x3 format. Some other steps to consider...

  • Make sure your tripod is stable
  • Find your focal and focus points and don't change them
  • Set your camera to manual exposure mode, so all subsequent files have the same exposure value.
  • Overlap the images by about 50%, it gives the software enough data to use when analyzing the match between consecutive frames.
  • Turn off IS on your lense if your shutter is below 1/30 sec.
I use Lightroom 2 to make the necessary adjustments to the raw files, and there is a handy way to open them in Photoshop. Just go to Photo/Edit in/Merge to panorama in Photoshop. There you will find a few options to select and you can experiment with the perspective issues. I often use auto, but it depends on the focal length.

It can be a challenge to think and visualize in a 1 x 3 panorama ratio when your camera viewfinder is in a 2 x3 ratio, but a little practice and experimenting takes care of that.

Panorama made from the three images below.
Canon 100-400 f5.6L @ 250mm, 1/13 sec @ f6.3, ISO 200,


Monday, September 15, 2008

No more split-graduated ND filters

For a landscape photographer, one must learn how to deal with the great variations in exposure value between the sky and the foreground. In the film industry, it has been called "sky control", although one may want to control the foreground as well. Generally, the sky ends up being much brighter than the foreground, and the disparity between the two, although within the range of the human eye, can't be handled by conventional film/digital sensors. So, what to do about this?

In the old days of film, I used the photography standard "Split-graduated neutral density filters". Essentially, they are thin pieces of glass or resin, that have a graduated pattern that blocks out light in varying stops (degrees of exposure value). They are clear in one half, and dark on the other. They come in different stop values with different degrees of gradients-usually described as hard or soft edge. You pick the right one for the specific scene and slide it down over the end of your lens and it makes the foreground and the sky the same exposure value.

I really disliked using those filters! First of all, they are not truly neutral in my opinion, they are difficult to get lined up correctly, they scratch and get fingerprinted easily, if it is raining, get out the umbrellas!, and finally, you are adding layers of stuff on the end of expensive, high quality glass, inevitably causing some quality compromise. Well, welcome to the digital world! I got rid of nearly my entire filter collection, including the Split ND's a long time ago. But what is the approach now? Below is an example of what/how I approach this issue today, using a digital camera, RAW files, and photoshop gradient filters.

Multiple Exposures using Photoshop's gradient filter

It was a dark morning with mostly cloudy skies. The thin clear area in the east looked promising for a splash of sunshine, so I quickly found a place that might work for a daybreak landscape. The tundra was in its prime crimson color, and I knew the warmth of it would explode at first light. When the sun is rising over a horizon with quickly moving clouds, there is little time to waste. In this scene, I knew that I needed to balance the exposure using two or more frames--one exposed for the sky and one for the foreground, so I set the camera to a 3 set auto-bracket sequence of 1-2/3 stop increments (that's about 5 stops total) I set the self timer to a 2 second delay, (I was on very soft tundra, not the best for stability). Once the sun appeared I shot a test shot and looked at the exposures, made sure the histograms looked o.k. for each scene. Oh by the way, being in manual exposure mode is a must.

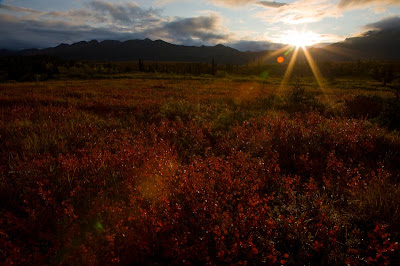
There is however and additional issue that arises: Lens flare. I used a 24-105mm zoom lens for this shot, and zoom lenses are pretty well known in general for flare, since there are so many internal glass elements for light to bounce off of. I own 5 lenses in the 24mm range, which is ridiculous, but they all seem to have a purpose. I did not however have my little 24mm prime, which would have handled the flare much better. So, what is my work around? Well, it's a little more time consuming, but pretty simple. For one frame, I just hold my finger over the sun so it reduces the flare on the bottom half of the image. Depending on the situation, you might need to reverse this for the sky image as well. What would be handy is a little articulating arm on the tripod that had a small dodge tool on the end of it, and one could bend it in place. But then, it's likely I'd forget that occasionally anyway! I always have my fingers, and working fast is the critical issue.

Exposure for the foreground, using my finger over the sun to block out the unwanted flare otherwise evident (see image below).

Exposure compensating for the bright light of the sky.

So, I have the two frames: 1) Foreground- with my finger in the sky over the light source to block the flare exposed for the foreground. 2) Sky. Open the files in Lightroom to make your adjustments to the raw file, then open the two in photoshop. Pick one image, drag it into the other while holding down the shift key and it aligns it perfectly (presuming your tripod did not move). Then apply a gradient filter using a mask, which emulates the old split graduated ND filter--but with much more control. This whole process can be done rather quickly.

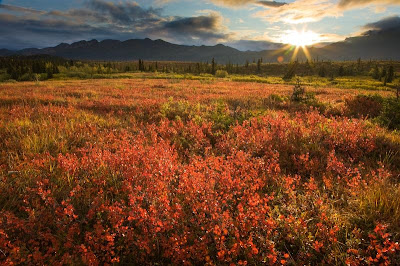
Final blended image using two photos and photoshop's gradient filter to emulate the former split graduated neutral density filter.

Yes, it is true that if you used the real Split grad ND filters, you would have an original file that is balanced. While that is a nice thought, I go for the former for reasons of simplicity, quality, and control. Welcome to the digital age. Get rid of the split grads!


Friday, September 12, 2008

Autumn in Fairbanks

Autumn has peaked in Fairbanks, which is a season I think passes way too quickly. An unusually warm few weeks in September has not even produced a frost near my home. Soon, any strong wind will be defoliating the golden yellow-leafed trees in an instant. I grabbed this shot on my way to town one afternoon. It overlooks the Goldstream Valley, on the North side of Fairbanks.


Wednesday, September 10, 2008

Alaska range

Aerial of Little Delta river and Mount Hayes of the Alaska range.
Canon 1Ds Mark III, 70-200mm 2.8L IS, (170mm) 1/400 sec @ f3.5, ISO 400

Aerial photography seems to be a never ending learning endeavor. Perhaps this is so because conditions almost always push the limits of camera's, every aircraft is different in nuance, and things are always happening fast. This photo is sharp for 2/3 of the frame, but a little blurred on one edge. This is somewhat odd, and I'm not sure of the exact reason. Image stabilization is generally an asset, but I have had act funny on occassion causing some blur. Additionally, the shutter speed was a little low, and the f-stop almost wide open. I used a polarizing filter, something I do less frequently now with a digital camera, but it can help cut the haze significantly. The down side...it robs up to two stops of light. With a focal length of 170mm, a 1/400 sec shutter speed is really pushing it to compensate for wind, aircraft vibration, odd shooting position, etc...

A shutter speed that is at least twice the focal length is a good starting point, but even more is good insurance. Shooting at 800 ISO would have given me a shutter of 1/800 sec., and that would have helped a bit. Avoiding vibrations that travel through the door, seat, or any part of the craft, twisting the body in a small seat to avoid framing the wing struts, and keeping a long lens out of the wind are things to deal with . The image is sharp enough, but I like them razor sharp. Mount Hayes is the prominent peak in the frame, which is one of the distinct and notable peaks of the range visible from Fairbanks. Such incredible country!!


Monday, September 8, 2008

Dall Sheep

Dall sheep ram, Denali National Park, Alaska
Canon 1Ds Mark III, 400mm 5.6L, 1/125 sec @ f/5.6, ISO 400


In the unhunted mountains of Denali Park there are some good sized Dall sheep rams. With virtually no pressure from humans, the sheep have slowly been habituated to human presence. I know a place where a band of rams hang out, but the area is large, and in this case, required quite a bit of hiking until I found them along the steep ridges. I took this shot with the Canon 400m 5.6L, I like this lens for two main reasons: one, it is very, very sharp and two, it is light weight. Unfortunately, it is not image stabilized and does require careful use, even on a tripod (especially a light weight tripod which I also favor when there is a lot vertical climb involved). In lower light, the auto focus does not perform as accurately as some of the fast lenses in this range, but all of the trade offs are worth it. I've taken some remarkably sharp photos with it, and as long as one is methodical about technique, its a winner. I actually bought it to trek for the Mountain Gorillas in Uganda, wanting something with good reach, light, but with excellent quality. The light on this late afternoon was pretty flat for most of the time, the exposure reveals how dim it was. But still, the ram struck a nice pose, and the background autumn colors are a good accent.


Saturday, September 6, 2008

Raven in the mist

Raven in the mist, Denali National Park, Alaska.
Canon 1Ds Mark III, 500mm f4L IS, 1/640 sec @ f/4, ISO 400

While waiting on a hilltop in Denali Park, I watched and waited as fog moved through the boreal forest shortly after sunrise. The angle of light was still low enough for good shadows. After photographing the fog and spruce trees, I noticed some ravens flying off in the distance. I grabbed my 500mm lens and threw it on a bean bag resting on the edge of my vehicle's sun roof. Auto focus was hopeless on a moving subject that small so I manually focused the lens and clicked a few shots. A few seconds before I was able to get set up there were multiple ravens flying, but only one left by the time I was able to shoot. The photo has a lot of mood, and is a telling scene of Alaska's interior boreal forest landscape.


Thursday, September 4, 2008

Caribou in the Alaska Range

Caribou traverse a mountain ridge in the Alaska range, Denali National park, Alaska.
Canon 1Ds Mark III, 500mm f4L IS, 1/1000 sec @ f/5.6, ISO 400


Canon's 500mm f4L IS lens vies for the position of my favorite lens. It is always loaded with a camera in wildlife country and its tremendous image stabilization capability enables me to shoot it hand held in many otherwise difficult situations. In this case, there was no time to set up a tripod. I saw the caribou beginning to run across the ridge and I grabbed the camera, quickly set an exposure and fired away. I have a bunch of frames in this series and none of them are perfect (in the sense that the animals are all lined up running), but this one was close. The drama of the mountain landscape adds a true wilderness feel to this image, which I find fitting for this amazing animal. Next time, I'll wish for large adult bull caribou to show for a repeat session. Click the image to see it larger.


Tuesday, September 2, 2008

Stormy landscapes in Denali Park

Autumn rain storm over the Plains of Murie, Denali National Park, Alaska
Canon 1Ds Mark III, 70-200mm 2.8L, 1/200 sec @f/8, ISO 100

Professional photographers who meet certain qualifications by the National Park Service are allowed to travel the Denali park road in their own vehicle for 10 days out of the summer. The only catch to this wonderful privilege is that only five permits are allowed each day, and nearly everyone wants the same dates: late August and early September. In effect, the selection process turns into a lottery, and if your name is drawn early enough, you get the days of your choosing. I was not lucky this year, however, due to a cancellation I was able to schedule a few days in late August.

While I always hope for clear skies when I'm there, mainly for the possibility to photograph Mt. McKinley, there is nothing better than the shifting light that afternoon storms brew in this mountainous region. The tundra was in explosive color as the blueberry and dwarf birch vegetation cast a crimson coat across the land. My wildlife photography options were pretty skimpy on this trip, but I did get a few landscapes that I like, this being one of them. So sorry it is such a small image here, click on it to see it bigger, I made it especially large so it can be appreciated.